
CEO Sean Hill Sits Down with Roadtrip Nation to Discuss Careers in the Outdoor Education Field

When students are in the classroom, they are often asked what they want to be when they grow up. They are told to dream big and that anything is possible. While some students will choose a more aspirational career, like a dolphin trainer-slash-ballerina, others will choose to mirror the jobs of those they look up to — their teachers. The need for teachers, and the encouragement for students to pursue teaching roles is needed now more than ever. While a career in education is full of possibilities, the roadmap to becoming a teacher is not always clear, nor do all teaching jobs look alike.
That’s why Teach For America and Strada Education Foundation fueled a Roadtrip Nation initiative to send three young adults on a free journey across Nevada to explore exciting new ideas, programs, and communities that are creating a new worldview of education in their own backyard. Along the way, they talked to inspiring professionals in education, legislature, the nonprofit sector, and other fields to get the advice they need to carve out their own paths in the state they call home.
And who better to talk about a unique career in education than our own Sean Hill.
Sean sat down with Roadtrip Nation to discuss his origins in education, and how it led him to his current role as CEO of Sierra Nevada Journeys. Hailing from Colorado, Sean has always had a love for the outdoors. He holds degrees focusing in environmental sciences, but really learned just how important outdoor education is when he found himself teaching in a windowless classroom in Houston, Texas. This led him to fully pursue outdoor education, so that students would be able to learn about the natural world without the boundaries of the traditional classroom setting.
Beginning in 2009, Sean spent the first eight years of his time at Sierra Nevada Journeys focused on education, first as an educator in the field and then as a curriculum developer, to finally training incoming educators. Sean’s firsthand experience of Sierra Nevada Journeys’ programs gave him the perfect foundation to progress through leadership roles in the organization, eventually shifting his focus to partnerships and the overall growth of Sierra Nevada Journeys. Sean shared openly that he doubted his own abilities at first when he stepped into the role of CEO, but credits his connection to nature and the mental health benefits that come from spending time in nature as factors that helped him as he settled into the role.
Sean’s progression through Sierra Nevada Journeys is inspiring, especially for the students who participate in our programs and are igniting their love of science and the outdoors. We hope that his story will inspire today’s students to become the leaders of tomorrow, and stewards of the environment.
Watch Sean’s full interview, and to explore more about Roadtrip Nation.

Behind-the-scenes at Oxbow Nature Area in Reno, Nevada, with Roadtrip Nation.
Community Agreements - Friendship Bracelets
Discipline: Team Building and Community Agreements*
Age Range: 10+
Estimated Time: 20+ minutes
What you need: Scissors, string or thin yarn a binder clip or tape
*Community agreements are created as a way to establish a mutual understanding or make a set of expectations for all members of a community to abide by. They can be based on many things, such as how to support each community member and how to make everyone feel included. Please see What is a Community Agreement? blog post before starting this project.
Instructions:
1. Have each community member choose a string that will represent what they bring to the community, or what they would like to see in their community.

2. Cut strings long enough to fit as a bracelet and tie them together in an overhand knot at the end. Two feet should be a good length with which to start.

3. Clip or tape the strings onto something stable, such as a clipboard or chair.
4. Put the strings in the order that you want the colors to be in. The string furthest to the left will make the first row.
5. Take the first string (light blue in the picture below) and put it across on top of the second string (red) so that it looks like the number 4. Be sure to cross OVER the second string, not under it.
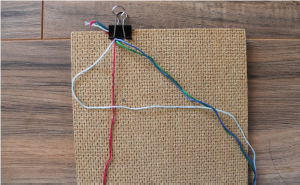
6. Wrap the tail end of the string (light blue end on the right) around the second string (red) and pull through the window you just made. Tighten the light blue string and move the loop up to the top of the bracelet while holding the second string (red) taught. Make a second loop by pulling the first string (light blue) around the second (red), the same way the first knot was tied.

7. Continue step 6 with each color of string, tying two loops around the strings to the right of the color you’re working on.
Example:
Light blue -> Red (2x), Green (2x), Dark blue (2x)
Red-> Green (2x), Dark blue (2x), Light Blue (2x)
Green-> Dark blue (2x), Light blue (2x), Red (2x)...etc.

8. Continue this process with the rest of the colors until the bracelet is long enough!

9. Wear the bracelet to remind you about what your community represents to you.
Helpful Hints: If you are having trouble following along with these instructions, there are many online videos that may be helpful! Here are a few:
DYI: 4 Easy Friendship Bracelets | Jada Draper
DIY Friendship Bracelets for Beginners | Craft Factory
Community Agreements - Using Construction Paper
Discipline: Team Building and Community Agreements*
Age Range: 10+
Estimated Time: 10-20 minutes
What you need: Construction paper; markers, pencils or paint; scissors; and tape or glue

*Community agreements are created as a way to establish a mutual understanding or make a set of expectations for all members of a community to abide by. They can be based on many things, such as how to support each community member and how to make everyone feel included. Please see What is a Community Agreement? blog post before starting this project.
Instructions:
1. Start with construction paper and grab some fun colors!

2. Choose two colors. Trace out a tree trunk and a tree top in any color you like.

3. Combine on to a background. Glue or tape tree on a larger piece of construction paper.

4. Add to the tree. Trace and cut out apples, fruits, treen nuts, squirrels and any other things that you might find on a tree.

5. Add values. Have everyone who is part of your community agreement add different values they believe are important for your community.

Exploring Outdoors at Oxbow Nature Observation Area in Reno
There are many wonderful places to visit in the Reno/Sparks area where you can get outdoors and learn about nature. One of our favorite locations is the Oxbow Nature Observation Area, 3100 Dickerson Road, Reno, Nevada. Located just west of downtown Reno, Oxbow is one of our field sites for Classrooms Unleashed.

In a 1-hour visit, you’ll be able to see some amazing wildlife and enjoy the fresh air safely and at a distance from other guests. It is a 0.8-mile trail loop within 22-acres of nature study area. Also, it’s good for all skill levels and accessible year-round.

The park is open daily from 8 am until sundown; it is best to visit the park early in the day to avoid crowds. Please note there are no dogs allowed, and it is easy to access with plenty of on-site parking. As you start the trail, take note of the signs at the trailhead as they explain why the park is called Oxbow and some of the wildlife you might see.

Picnic area located at the end of the trail.
As you travel down the trail, you will quickly come to a fork in the road that gives you three options: left toward the main trail; right toward a nice observation of the oxbow — a U-shaped curve in the Truckee River; or up, which leads you to an observation deck. We recommend that you start with the trail leading “up” as it gives you a bird’s eye view of the park. Speaking of birds, Oxbow is a wonderful place to go for bird observation. This year alone, 76 different species of birds have been observed at the park, making it a great destination to be introduced to animal observation. You might also see a wide variety of squirrels, snakes, and even deer.

After the stop at the observation deck, you will pass by the Truckee River, a great place to make even more observations! The rest of the trail is linear and should be easy for you to navigate. You will know you have reached the end of the trail when you reach the picnic area (see photo), which is a great place to sit down, eat a snack, and enjoy the nature around you.
Take a moment at the picnic area to sit still for a moment and see what you can observe. On your way back to the parking area, make sure to stop by the small deck by the river as it boasts a beautiful and expansive view.
NOER grant helps girls in STEM get outdoors in Northern Nevada
By Sean Hill, President and CEO of Sierra Nevada Journeys

Saturday, Sept. 28, celebrates National Public Lands Day and Nevadans have also dubbed it Nevada Public Lands Day. In Northern Nevada, we want our children to have a chance at the opportunities provided by local industry to lead in STEM, outdoor, and conservation careers. Careers that pay well and protect our public lands. But we know that far too many of our girls are hitting a green glass ceiling, with only 10% of women in green jobs.
We at Sierra Nevada Journeys want to be a part of the solution to this crisis.
Based in Reno, Sierra Nevada Journeys is a nonprofit organization for Nevada students focusing on innovative outdoor, science-based education programs that develop critical thinking skills and inspire natural resource stewardship.
We were one of 23 unique programs chosen in 2024 for the Nevada Outdoor Education and Recreation Grant Program (NOER), a bill passed in the 2019 legislative session. The grant helps us provide outdoor experiences for students. NOER awarded these programs over $250,000 in 2024 in nearly every county.
We used this funding to support our “Girls in STEM" program. Specifically, this funding allowed us to provide transportation for the girls from Reno to our Outdoor Education camp for science and outdoor learning one weekend this past spring. The girls built self-confidence in STEM, and the program helped connect them to women who are leaders in STEM and green careers like engineering, education, and technology. Girls in STEM also featured youth development and collaborative problem solving on the Sierra Nevada Journeys high-hopes challenge course kayaking, outdoor exploration, and STEM activities.
We’ve been working closely with leadership from NOER since early in the agency’s inception. Sierra Nevada Journeys has both sought feedback and provided perspective and context around our efforts at reducing barriers to access to outdoor education for youth in Nevada.
We are grateful for this grant funding and the opportunity it offers our children. We know that this camp plays a role in helping more girls become leaders in STEM and in good-paying, green jobs. We also know that there needs to be continuous support for programs like NOER so these girls can return to camp as leaders and mentors to support the next generation of Nevada’s decision-makers.
Thank you Nevada Conservation League for helping us spread the word about conservation and protecting Nevada’s natural resources.
What is a Community Agreement?
Discipline: Team Building and Community Agreements
Age Range: 10+
Estimated Time: 20-60 minutes
What you need: Any crafting supplies you want to use. You can be really creative and use whatever feels the most inclusive for the group with whom you are working. Are you low on art supplies? See the community agreement project posts for ideas on how to create a community agreement using your computer or everyday household items.

Introduction: Community agreements are created as a way to establish a mutual understanding or make a set of expectations for all members of a community to abide by. They can be based on many things, such as how to support each community member and how to make everyone feel included. Some communities may struggle to get along with each other when there are shifts in normal dynamics. For example, those sharing living spaces may currently be experiencing increased tension or conflicts due to spending much more time together in a confined space. A community agreement can be beneficial to help dissolve these problems, as it allows everyone to freely express their wants, needs, and expectations in a group setting.
Instructions:
There is no one right way to design these agreements. Please see our example blog posts for further details on creative ways to engage all community members in the making of your agreement. What are the steps to create your own community agreement? Follow these steps:
1. Determine who is in your community. A community is defined as a group of people who share something in common. Some examples may include:
- Your family
- The people who with you
- A sports team you are on or club you are in
- A classroom with students and teachers
- A workspace including bosses and coworkers
A community can be small or large; it depends on how you define it!
2. Allow everyone in your community to have space to contribute what they want in the agreement and be heard. One method could be to share values or expectations in a circular format, allowing each person involved to bring up one thing they want to be included in the agreement at a time.
3. Time to get creative! Depending on what you have in your space, you can get crafty with paper, paint, rocks, string, beads, etc. If craft supplies are limited, try keeping it simple and reuse household items for your visual representation. Try repurposing toilet paper rolls, tissue boxes, glass or plastic containers, etc. We will provide some examples in the following blog posts if you are feeling stuck!
4. Display your agreement somewhere where it is easily seen so that each community member can be reminded of what they agreed to regularly. You can refer back to it when you feel like your community may not be fulfilling the agreement, or when you think you are following it very well! Positive reinforcement is a great way to highlight your agreement, so remember to give appreciation to those in your community who are actively working to follow it.
Social Emotional Learning. What Is It and Why Is It Important?

If you have a school-age child, you may have heard about Social-Emotional Learning (SEL) through your school or their teachers as the term has gained popularity in formal education. Additionally, it has been an integral component of learning at residential environmental education centers (outdoor schools) like Sierra Nevada Journeys outdoor program at our Outdoor Education Camp.
Our Overnight Outdoor Learning program has been an extension of regular classroom programs with schools. Held at the beautiful Camp in Portola, California, Overnight Outdoor Learning is designed for fifth- and sixth-grade students and includes STEM, teambuilding, and SEL components. When students attend the 3-to-5-day program, we use the outdoors as their classroom and they learn using experiential, hands-on approaches. They are encouraged to use critical thinking by asking questions, making observations and conducting investigations.
One of the key components of Overnight Outdoor Learning is SEL defined as,
“The process through which children and adults understand and manage emotions, set and achieve positive goals, feel and show empathy for others, establish and maintain positive relationships, and make responsible decisions.”
- Collaborative for Academic, Social, and Emotional Learning (CASEL)
Why is SEL important?
SEL provides a foundation for safe and positive learning and enhances students' ability to succeed in school, careers, and life.
Research shows that SEL not only improves achievement by an average of 11 percentile points, but it also increases prosocial behaviors (such as kindness, sharing and empathy), improves student attitudes toward school, and reduces depression and stress among students (Durlak et al., 2011).
During the coronavirus pandemic, many youth may be experiencing stress and anxiety. They may feel disconnected from others due to quarantine and schools being closed. The need for SEL is rising due to these circumstances.
Ask your school about SEL programs that they may offer. Since 2012, the Washoe County School District has been using SEL strategies as a way to increase graduation rates.
Through Washoe County School District’s Parent University, you’ll find regularly scheduled SEL courses to help parents engage in SEL practices, such as College and Career Success and Building Resiliency in Children.
Sacramento City Unified School District’s SEL at home is a great place for parents to learn SEL principles that they can do with their children. They include:
1. Focus on strengths.
2. Follow up with a consequence for misbehavior.
3. Ask children how they feel.
4. Find ways to stay calm when angry.
5. Avoid humiliating or mocking your child.
6. Be willing to apologize.
7. Give children choices and respect their wishes.
8. Ask questions that help children solve problems on their own.
9. Encourage sharing and helping
100 Days of Birds

by Gabrielle Tribelli
Recently, a friend shared with me The 100 Day Project: an art project for individuals to explore creativity independently and generate new inspiration daily for 100 days. It’s a personal project, but also has a hugely supportive community behind it as people tag #The100DayProject to their daily creations online. So I thought I’d give it a try--what’s 100 days anyway? It can’t be that long …
I’m on day 22, and although I have a lot of time to go, I’ve made plenty of new findings and new friends. Bird friends!
I recently moved to Portola, California as a science instructor with Sierra Nevada Journeys and I’ve become more aware of the incredible wildlife around me — both familiar and unfamiliar. I keep getting this feeling of, I want to know more; I need to know more. My fellow scientists are so intelligent — each bringing their own knowledge of flora (plants), fauna (animals), and natural science — that I am constantly inspired by them to gain more knowledge. One area of fauna, or animals, that I want to improve my knowledge of are birds. So I thought, why not use my love for painting and art to learn about the birds around me in a way that seems tangible for me. I decided my personal project is to watercolor one bird a day.
One morning my housemates and I awoke quietly— the loudest sound coming from the birch tree in the backyard, covered in yellow sprinkles. The yellow sprinkles were Townsend’s Warblers tickling our ears with their sweet-pitched songs. I painted my first bird that day. Twenty-two days have gone by since, and my bird-a-day project has opened my eyes wider to the sky, the trees, and the ground--searching both for birds that I know of already as well as those I’d like to discover. I think I hear a lot more these days too. My awareness of my natural surroundings has shown improvement in just two weeks.
One thing I’d love to share from my experience is that creativity is not an interest separate from the natural environment. I believe nature is the most creative pioneer of all, and I think everyone is capable of recycling its endless inspiration. Just listen to the birds’ songs.

- Gabrielle Tribelli is a former outdoor science instructor, and when she is not teaching students, she is on her way to becoming a world-renowned watercolor artist.


Read more about The 100 Day Project.
Think Like an Engineer Webinar - Part 1 & 2
Discipline: Engineering
Age Range: 7+
Estimated Time: 60 minutes for each webinar
What You Need: Part 1 - 2 pieces of paper; a pen or pencil; two cups of the same size; 15-20 pennies (preferred) or other small objects (paperclips, almonds, beads, etc.)
Part 2 - 8 pieces of paper; tape; two plastic bins or containers of the same height; small objects for weights (blocks, small plastic building bricks, coins, etc.); a pen or pencil

Engineers are problem solvers! In this interactive webinar, learn how engineers use math, science, and a special process to design solutions to real-world problems!
Each webinar will take you through the engineering design process in order to solve a problem. Listen to a story and use hands-on science to solve how to cross the river.
Think Like an Engineer Part 1 - 60 Minutes
Think Like an Engineer Part 2 - 60 Minutes
Bird Feeder Craft
Discipline: Nature Craft
Age Range: all ages
Estimated Time: 15 minutes plus observation time
What You Need: one apple, birdseed, yarn or string; peanut butter; knife (with adult supervision); writing utensil; paper or printer (optional)

When the weather changes seasons from colder weather to the sunny skies of spring, many birds are building nests and preparing to have their young. Spend time together as a family creating this bird feeder together! When the bird feeder is finished you can hang it up outside and watch all the birds that visit your yard.

Instructions:


With a parent’s help or permission, carefully use a knife to cut horizontal slices of an apple. They should be around a ½ inch thick.
Use a pen or pencil to poke a hole near the top edge of each apple slice. Be sure not to poke too close to the edge, or the apple may break!
Spread peanut butter to cover both sides of each apple slice. If you are having trouble getting the peanut butter to stick, consider dabbing the sides of the apple slice with a paper towel to dry it off before spreading the peanut butter.
Cover the peanut butter apple in birdseed! Turning over both sides of the slice in a bowl of birdseed works great for this part of the activity.
Cut off around 1ft of yarn and thread it through the hole you made in the top of your apple. If it is tricky to find your original hole, just poke a new one! Then, tie off the yarn with an overhand knot.
Hang your bird feeder wherever you’d like! Trees and hooks near windows are great for observing birds from your own home.
If your bird feeder runs out of seed, or falls off of its yarn, feel free to repeat this process and make as many bird feeders as you would like.

Spend some time each day watching your new bird feeder to see what types of birds visit. It might take a few days for the birds to find your feeder, so don’t worry if you don’t have any visits the first day.

Helpful Hints
If you’d like, you can complete this craft using a pinecone instead of apple slices! Tie a string around the top portion of the cone and then smear peanut butter all over the scales of the pinecone. Sprinkle seeds over the cone so that they stick to the peanut butter. Discuss which method might attract more birds and why.
Reflection Questions
What do you notice about the birds that visit your feeder?
Are they large? Small?
Do they have any specific colors or patterns that are obvious?
Download the Making Observation Activity Page to record your findings or write them down in a notebook to help keep track of your observations
A Resource to Identify the Birds You Observe
This website is an excellent resource for identifying and learning about the birds that live near you
Sources:
White-breasted nuthatch photo: https://www.audubon.org/field-guide/bird/white-breasted-nuthatch
All About Birds.org. Instant ID: https://www.allaboutbirds.org/news/#/_ga=2.86386906.396297624.1588368924-1087684947.1588368924