CSI: Fingerprint Patterns
Discipline: Anatomy; Forensic Science
Age Range: 5+ (with adult supervision)
Estimated Time: 10-15 minutes
What you need: Paper, pencil, clear tape, magnifying glass (optional)
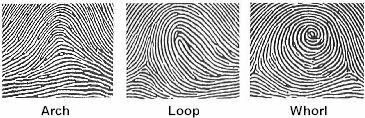
Instructions: Fingerprints are a great way to tell people apart because everyone’s fingerprints are unique. This means that no two people in the world have the same set of fingerprints! Even though no two people’s fingerprints are exactly alike, there are three main fingerprint patterns. Which type of fingerprint pattern do you have? Follow these steps to find out!
Use your pencil to scribble a dark spot on your paper. Keep scribbling until you have a lot of dark pencil markings in one spot.
Rub your fingertip over the pencil markings. This will coat your fingerprint in a thin layer of gray material from the pencil.
Press a piece of clear tape onto your fingertip. Rub the tape so the print transfers evenly.
Remove the tape and stick it onto a blank area of your paper.
Look closely at your fingerprint on the tape (using your magnifying glass if you have one). Which pattern does it look most like?
Learn Height and Fathom
Discipline: Mathematics and Measurement; Proportion
Age Range: 5+ (with adult supervision)
Estimated Time: 10 minutes
What you need: Measuring tape, a pencil and paper to write down your findings (If you don’t have one, you can use a string and a ruler or other alternatives described below.)

Instructions: A fathom is a measurement from fingertip to fingertip for a person when standing straight up, with both arms spread out to the side. For many people, their height (from the bottom of the foot to the top of the head) and their fathom are the same! Follow these steps below to see how your height and fathom compare.
Take off your shoes and ask a family member or friend to measure your height while standing up straight. If you don’t have someone to help, just lay on the floor with your feet flat against a wall. Mark where the top of your head is with a small object such as a coin or a pencil. Write down your height on a piece of paper.
Hold your arms out straight to your sides. Ask a family member or friend to measure your fathom (from the ends of your fingertips on one hand to the other). If you don’t have someone to help, lay down with your arms spread wide, brushing the fingertips on one hand up against the wall. Use a small object to mark the ends of your fingertips (on your hand not touching the wall). Write down your measurement for fathom.
Are your height and fathom the same or different? Either result is normal! If they are different, subtract the smaller number from the larger one to find the difference! Write down your answer.
As we grow, our body measurements and ratios change. Adults are more likely to have matching and height and fathom measurements because they are finished growing. Try measuring an adult in your house and see how their results compare to yours!


Why Do Pennies Lose Their Shine?
Discipline: Chemistry
Age Range: 5+ (with adult supervision)
Estimated Time: 10 minutes
What you need: Dull pennies, vinegar, table salt, bowl, spoon, and water
Instructions: Have you ever wondered why pennies lose their shine and start to look dull and dirty? This happens because pennies are made up of copper. When copper touches oxygen, it begins a chemical reaction called oxidation, which makes pennies look dull. There’s another simple chemical reaction that can make dull pennies look shiny and new again! Just follow these steps to try it at home:
Ask an adult to help you mix one teaspoon of salt into ¼ cup of vinegar.
Place a dull penny in the mixture. Count slowly as you stir the penny around in the vinegar mixture.
Watch as the penny becomes shiny right before your eyes! How many seconds did it take for the penny to look shiny and new?
Remove the penny from the vinegar mixture and rinse with water.
Watch your penny sparkle!
This works because vinegar is an acid, which is a type of liquid that can be used to break down other materials (such as the copper oxide formed on your penny from oxidation). Try using another acid, like lemon juice or hot sauce, and see if it has the same result!

Reflections
Discipline: Physical Science, Light Refraction
Age Range: 5+
Estimated Time: 5-10 minutes
What you need: A mirror and a spoon
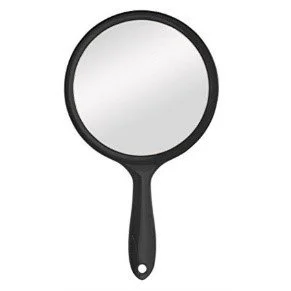
Find a mirror in your house. What does your
reflection look like? Draw a picture of your reflection in the box below (or on a piece of paper).
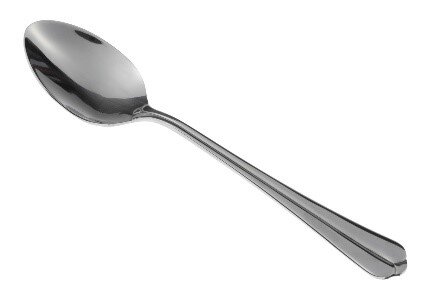
Now, find a spoon. What do you think your reflection will look like when you look into the inside of the spoon? Observe your reflection and draw a picture on a piece of paper).
Flip your spoon around so the curved side is facing outward. What do you think your reflection will look like when you look into the spoon like this? Observe your reflection and draw a picture on a piece of paper.
Reflections can be described as light that doesn’t enter a medium, but are sent back out from the surface of the medium. Here are three basic types of mirrors that create different types of reflections:
Flat or Plane: This type of surface is the same as your mirror. It has a flat surface and causes an image to be flipped from left to right when reflected.
Concave: This type of surface is like the inside of your curved spoon. It has an inward rounded surface and causes an image to flip upside down. It also can cause the image to be magnified.
Convex: This type of surface is like the outside of your curved spoon, It has an outward rounded surface, causes an image to be magnified, and is not flipped.

Wind Cars
Discipline: Engineering, Physical Science
Age Range: 7-12
Estimated Time: 20 minutes
What you need: Notecards or paper, four-to-five straws, four lifesavers, one meter of tape

Note: Supplies can be substituted or exchanged for materials you have at home. For example, notecards can be swapped for cardboard, straws can be swapped for pencils, and lifesavers can be swapped for anything that is round or moves!
Instructions:

You will use the materials you have been given (or gathered) to create a car that is powered by the wind (your breath).
Your only rule is that your wheels must move!
Once your car is complete place it on the floor or on a tabletop, blow a gust of wind, and see how it flies! (Additional tests: see how many breaths it takes to move across the floor, or measure the distance your car traveled in one breath.
Once you test your car, try to improve it! What worked well the first time? What can you improve? Design another car and repeat steps 1-3!
Resources: https://www.teachengineering.org/activities/view/cub_sailcars_activity1 http://www.lynnmiskell.com/puff-car/

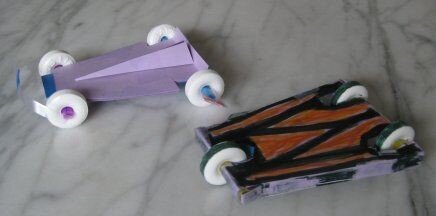
Other design option.

Other design option.
Making Observations, A Sensory Scavenger Hunt
Discipline: Scientific Skill Practice
Age Range: All ages
Estimated Time: 20 minutes
What you need: An area outdoors or indoors students can explore objects around them. Also, download our Sensory Scavenger Hunt Guide at the bottom of this article.
This activity focuses on making observations. Ask: “Do you know what it means to make an observation?”
Making an observation is a way to learn and notice more about the world around us.
Ask: “Can you think of anyone or anything who makes observations?”
That’s right! Scientists, doctors, teachers, detectives, your parents, artists, animals, and even you make observations every day.
You can use all five of your senses to make observations: your sense of sight, hearing, smell, touch, and taste. Today when making observations outside, don’t use your sense of taste.
Now, let’s practice! Go outside (or stay indoors if don’t have access to the outdoors at this time). Find an object in nature that you and your scientist would like to observe.
Take a close look at your object. What do you notice using your sense of sight? Try describing the size, color, shape, etc.
Now, feel your object. What do you feel? Does it feel smooth? Rough? Cold? Bumpy?
Next, give your object a sniff! What does it smell like?

Last, try our sense of hearing. Your object may not make a sound on its own, but can you make any sounds with it? Try tapping it, crumbling it, or scratching it!
Now that you’ve practiced making some observations, see what else there is to observe around you. You can use the chart on the next page to complete the Sensory Scavenger Hunt with your scientist by finding some more interesting objects in nature!
Helpful Hints: Adults, if you are doing this activity with your child(ren, ask them the questions and have a discussion before moving on to the next item on the student guide.
New words: Observation, making an observation means to learn and notice more about the world around us using our five senses.


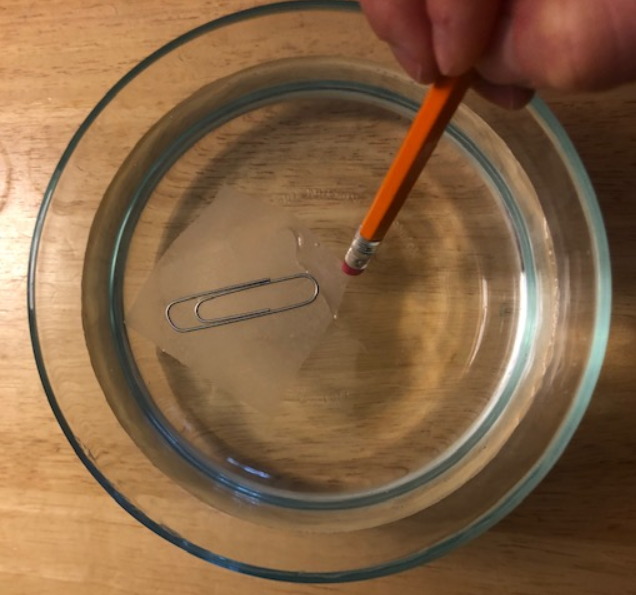
Make a Paperclip Float
Discipline: Physics, Life Science
Age Range: 5+ (with adult supervision)
Estimated Time: 5-10 minutes
What you need: a container of water, a small square of tissue paper or newspaper, a paperclip, and a pencil
What happens when you drop a paperclip into a bowl of water? Does it sink or float? Normally it sinks, but you can use science to make it float on the surface! Try this: cut out a small square of tissue paper and place it on the surface of a container of water. Place the paperclip on top of the tissue paper. Now, VERY gently and patiently, use the eraser end of a pencil to push the corners of the tissue paper down into the water. Slowly work your way closer and closer to the paperclip without touching it. Once most of the tissue paper is under the water, use the pencil’s eraser to gently push it all the way under the water. The paperclip should remain floating on the surface! It might take a little practice – don’t give up!
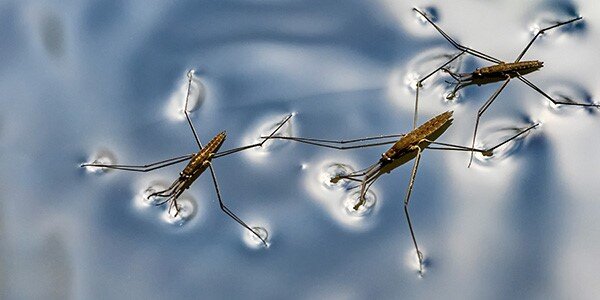
This works because of something called surface tension. The molecules in water are attracted to one another, kind of like tiny magnets. This creates a “film” or “skin” on the surface of the water which can be strong enough to hold up a paperclip. Surface tension also helps some insects, such as water striders, to move across the surface of the water!
Sources:
https://sciencebob.com/make-a-paperclip-float/
https://www.nwf.org/Educational-Resources/Wildlife-Guide/Invertebrates/Water-Striders