3) SNJ AT HOME - Teambuilding & SEL

Community Agreements - Using Google Drawings

Discipline: Team Building and Community Agreements*
Age Range: 10+
Estimated Time: 20-30 minutes
What you need: A computer or tablet with internet access; a Google account (it is free to create one)

digital10.png

*Community agreements are created as a way to establish a mutual understanding or make a set of expectations for all members of a community to abide by. They can be based on many things, such as how to support each community member and how to make everyone feel included. Please see What is a Community Agreement? blog post before starting this project.

Creating a visual community agreement using tools online is a good method for creating a community agreement if you do not have any paper or other crafting materials available.

Instructions:

1. Open your Google Drive and select “New”

digital1.png

2. Select More → Google Drawings

digital2.png

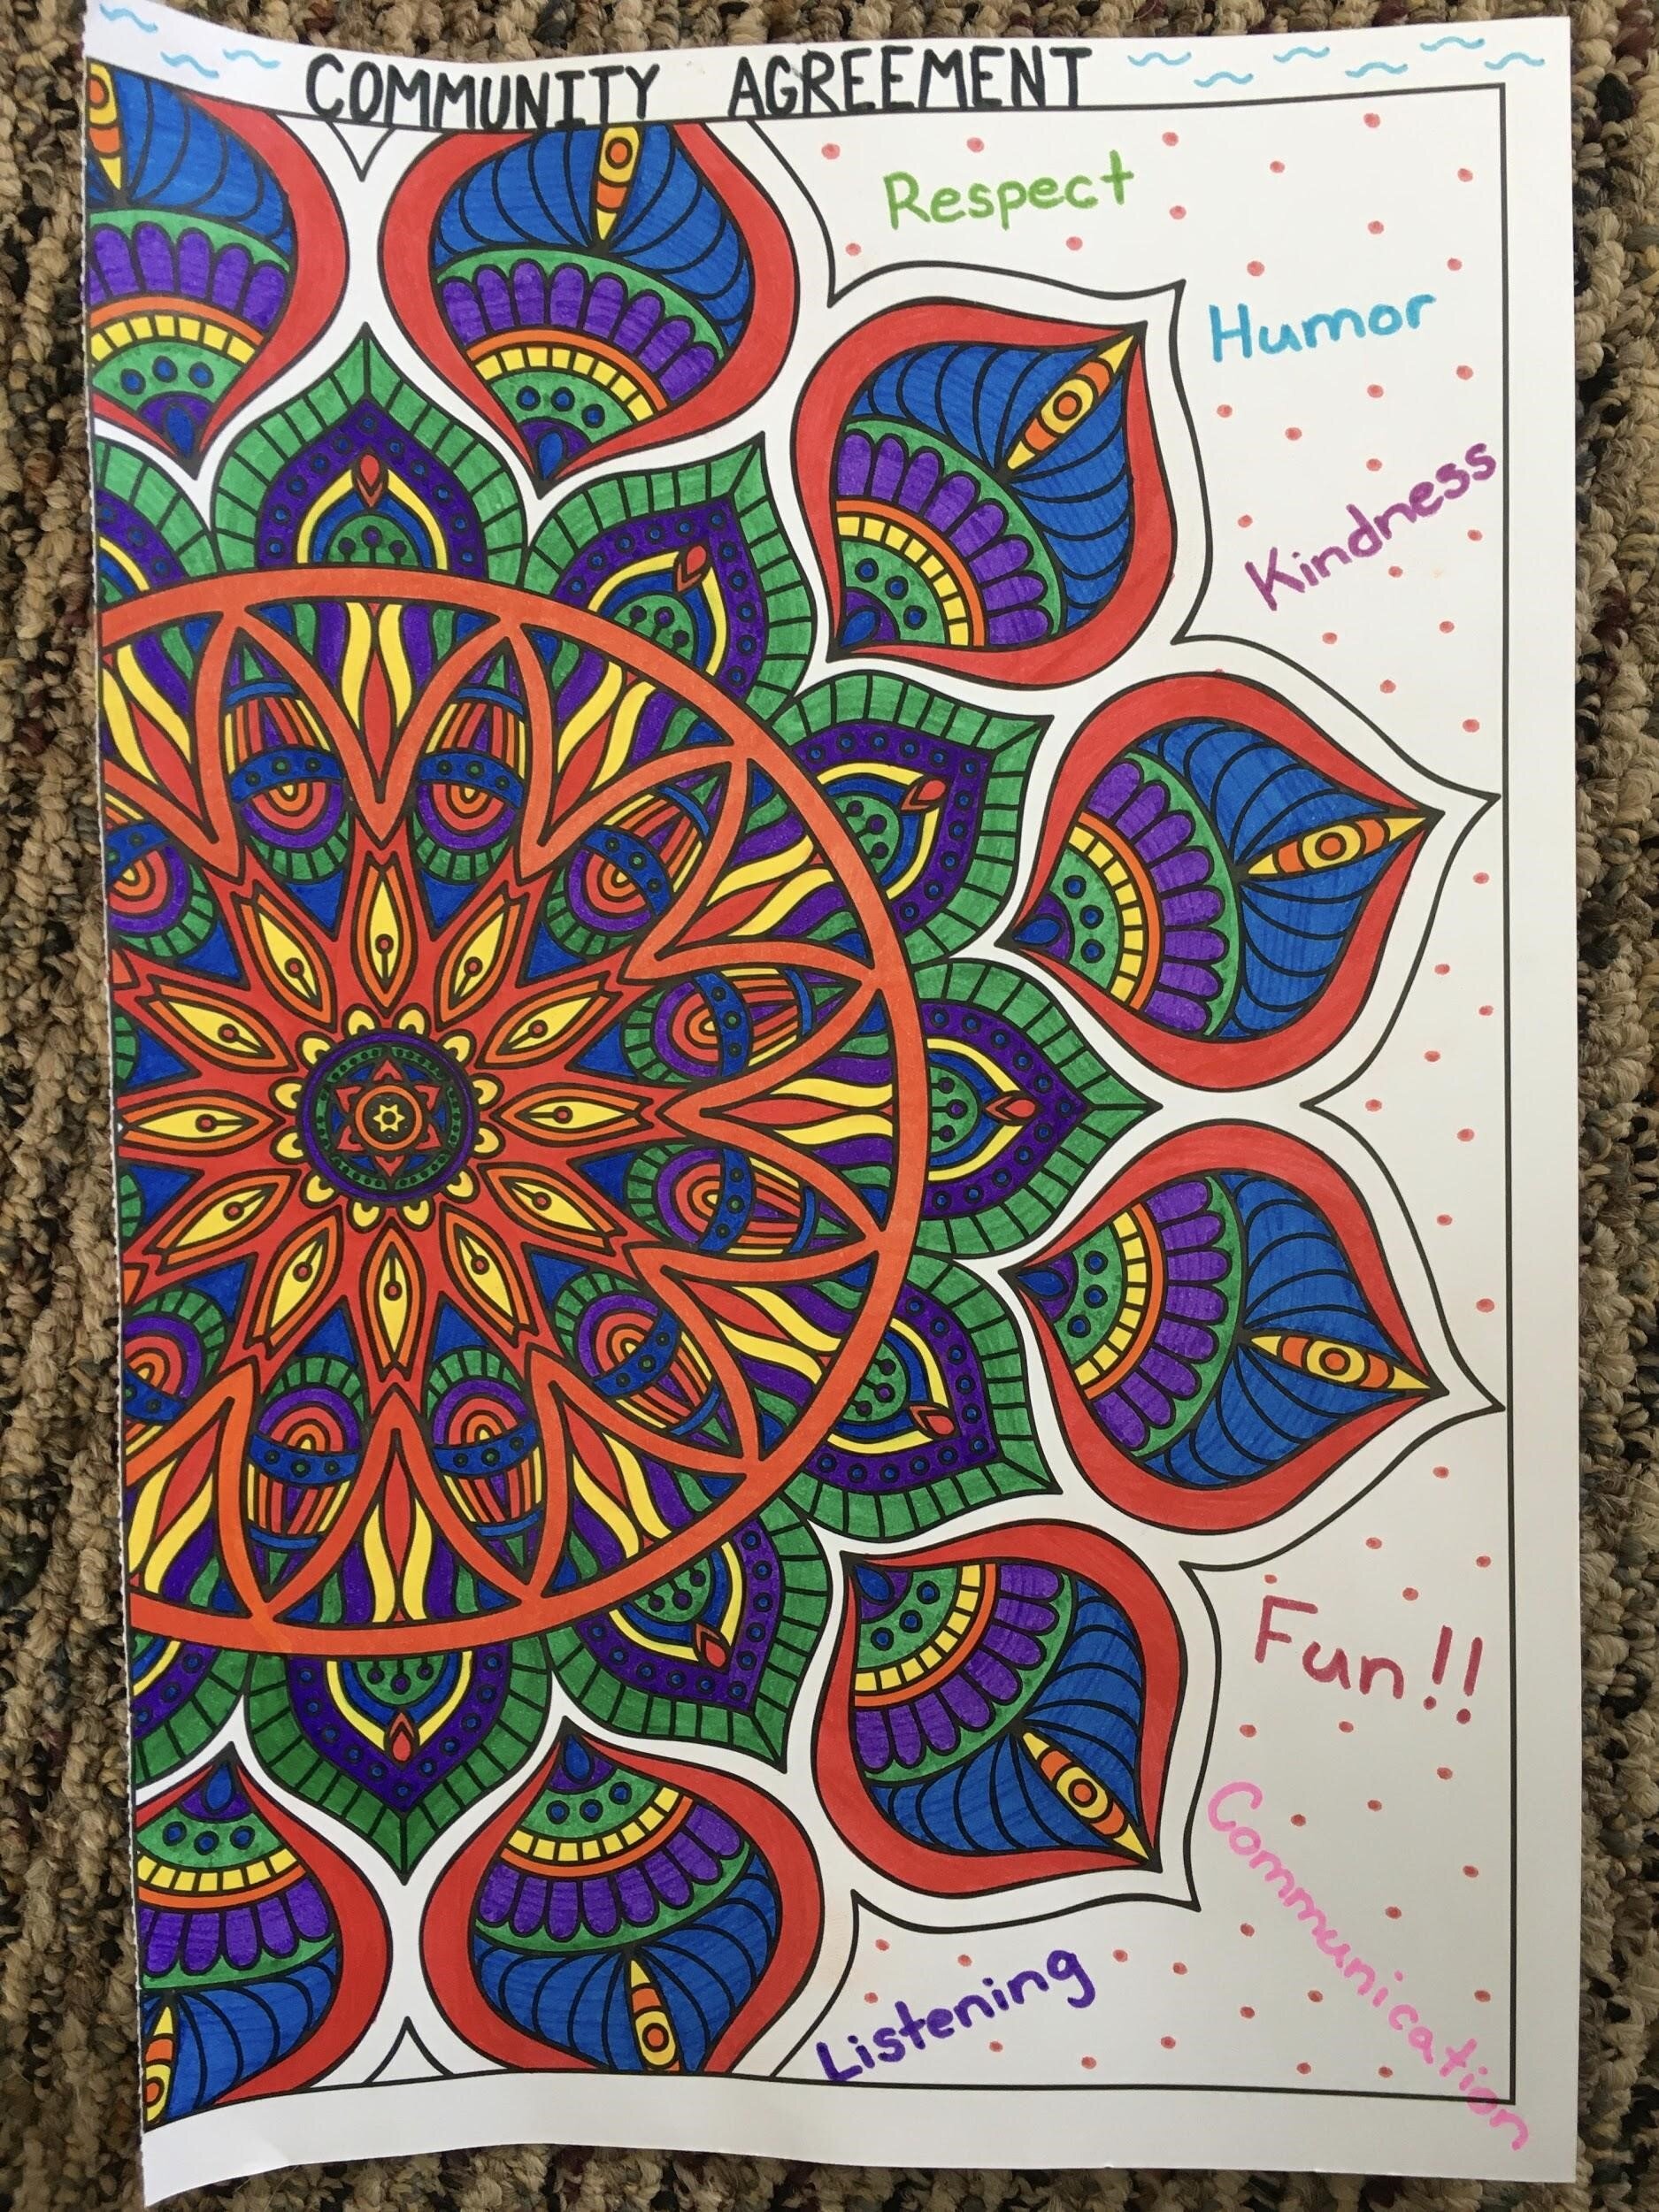
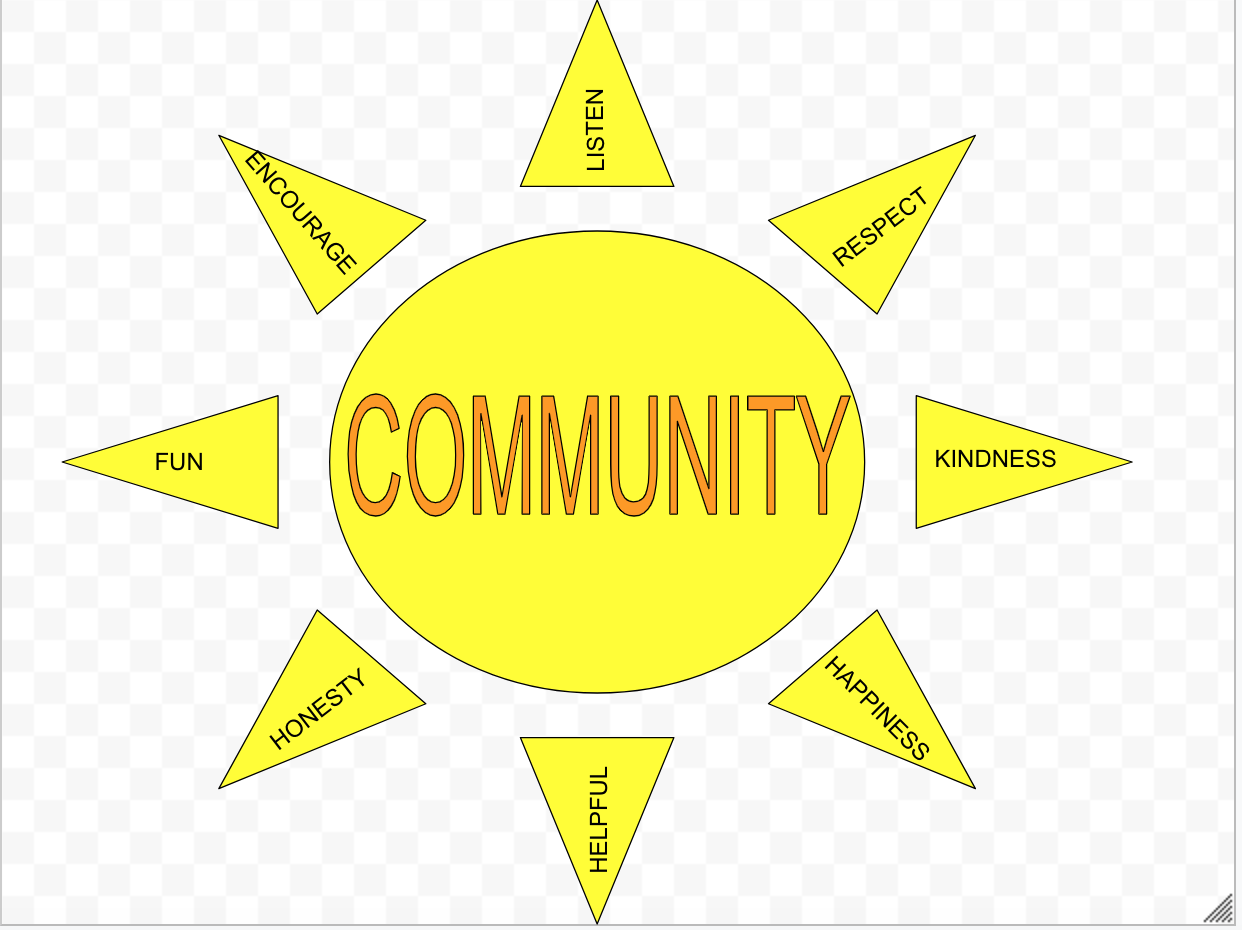
3. For this specific example, we will create a sun with community values as the rays. Feel free to get creative during this step, as there are many other shapes and tools available. To create a shape use: Insert → Shape → Shapes

digital3.png

4. A plus sign should show up once you have selected a shape. Drag this plus sign to create and enlarge your image. You should end up with something like this:

digital4.png

7. You can change the color by selecting your shape and hitting the fill icon. Select whatever color scheme your community likes.

digital5.png

6. To create a center word or idea, try using Word Art or a text box. Pictured below is an example using Word Art: Insert → Word Art → Type out whatever you would like in the box that appears. This could be your family or community name, or it could include the names of everyone within your community. Get creative here!

digital6.png
digital7.png

7. Edit your center word in whatever way your community likes. You can change color or font, just make sure to have the word selected.

tpimage12.jpg

8. You may add in community values wherever you would like as well. For this example, we will add values to the sun rays using text boxes. Click on the T icon (circled below) to create a text box. Drag the plus sign that appears to build the box, and use the dot above the box (circled below) to rotate and fit it inside the sun rays. Type out your community values into the boxes.

digital9.png

9. You can get even more creative than this by exploring more of the Google Drawing functions. Make sure to listen to the people within your community and allow everyone space to contribute. Your finished product may look something like this:


Helpful Hints: Google Drive allows for collaboration by multiple people at the same time. Anyone else with a Google account can be added to your document or drawing by clicking the blue share button in the top right corner. Simply add their emails or share the link provided. Sharing will allow all of you to all work on your community agreement at the same time if you have multiple internet enabled devices.

Try creating a loose plan before getting started so that all community members have an open space to share ideas and contribute values before moving to the visual aspect.

If you have access to a printer, you can print out a copy for each community member to keep. If not, making your document shareable is another good way to distribute the agreement to everyone.

Community Agreements - Using a Coloring Page

Discipline: Team Building and Community Agreements*
Age Range: 10+
Estimated Time: 10-20 minutes
What you need: Coloring page (coloring book or online page that you print out); markers, colored pencils or paint

*Community agreements are created as a way to establish a mutual understanding or make a set of expectations for all members of a community to abide by. They can be based on many things, such as how to support each community member and how to make everyone feel included. Please see What is a Community Agreement? blog post before starting this project.

colorpg1.jpg

Instructions:
1. Start with a coloring book and choose your favorite page, or find an online coloring page that you can print or draw your own design.

colorpg2.jpg

2. Add some color.

colorpg4.jpg

3. Add values. Have everyone add different values they believe are important for being in a community.

colorpg5.jpg

Vision-Blocked Polygon

Discipline: Team Building
Age Range: All ages
Estimated Time: 20-30 minutes
What you need: At least three or more people our choice of rope, string or yarn, approximately 20-30 feet in length; vision blockers (i.e., bandana, scarf, beanie, t-shirt, pillowcase, headband, or a hoodie worn backward)

vision1.jpg

Instructions:
You and your team are going to work together to use the rope in front of you to create a shape. The catch is that you will be vision-blocked while you do it!

  1. Have each member of your team pick a spot on the rope and grab onto the rope with hands out in front of them like a set of handlebars on a bicycle (palms face down, hands out in front on the rope).

  2. Once each team member has grabbed onto the rope and put on vision blockers, decide on which shape you would like to make. You can make any shape that you want, but here are some examples to get you started:

    Easiest: circle, square, triangle
    Easier: banana, ice cream cone, tree, hot sauce bottle
    Medium: the letter “Y,” shape of Nevada or California, Pac-Man
    Harder: star, lightning, heart, tea kettle
    Hardest: sunglasses, human body outline, a hand

  3. Once you have begun, there is one important rule: You may not take your hands off of the rope! You may slide your hands up and down the rope, but if you bump into someone you cannot go around them.

  4. During the activity, you will have to communicate with your team members to try to create the shape. Once you feel good about your shape, lower the rope to the ground. Once you have done this you can take your vision blockers off to see how you did!

vision2.jpg
vision3.jpg

Debrief Questions:

  1. How did it feel to be vision-blocked?

  2. What was your plan for this activity? How did you come up with that plan?

  3. What did/didn’t you enjoy about the activity and why?

  4. How did you ensure that everyone knew what was happening?

  5. Did you adapt your approach to the activity at any point? How did you adapt?


Helpful Hints: Start with a less challenging shape and once it is complete, talk about it as a team afterward. This will give your team a chance to talk about what went well, and make an improved plan for the next shape!

With some of the more challenging shapes, you may not get it perfect. Our team took 30+ minutes trying to get into the shape of a star before we decided as a group it was the best we could do.

New Words:

Polygon: Any two-dimensional shape formed with straight lines. Triangles, quadrilaterals, pentagons, and hexagons are all examples of polygons. The name tells you how many sides the shape has.

Mystery Object

Discipline: Team Building
Age Range: All ages
Estimated Time: 10 minutes
What you need: At least two people, vision blockers (i.e., bandana, scarf, beanie)

MysteryObjectimage1.jpg

Instructions:
This activity will require you to trust a partner (or two) to accomplish tasks with limited senses. Before you begin, make sure that everyone involved is comfortable being vision blocked.

With Two People Available:

  1. Decide who would like to be vision-blocked first and who would like to give the directions first. Using a bandana or other materials, block the vision of the designated person.

  2. The director will help spin the vision-blocked person around three times.

  3. The director will silently choose a mystery object somewhere in the area, then begin directing the vision-blocked person towards it. (i.e., “Forward! Stop! Turn right! Crouch down! Pick it up!”) NOTE: The director may not touch the vision-blocked person. They must direct using only words.

  4. Once the object has been retrieved, the vision-blocked person must use touch, smell, and hearing to make observations and try to guess what the object is.

  5. Switch roles and repeat!

maysteryobjectimage2.jpg
mysteryobject3.jpg

With Three People Available:

mysteryobject4.png
  1. Choose one person to be vision-blocked, one person to speak (speaker), and one person to act (actor). Using a bandana or other materials, block the vision of the designated person.

  2. The speaker must stand between their two partners, facing the actor and with their back toward the vision-blocked person.

  3. The actor will silently choose an object in the area, then use motions to act out directions for the vision-blocked person to find that object.

  4. The speaker will translate the actor’s motions into words, and the vision-blocked person will follow their directions.

  5. Once the object has been retrieved, the vision-blocked person must use touch, smell, and hearing to make observations and try to guess what the object is.

  6. Switch roles and repeat!


Debrief Questions:
As a team, try to reflect on and answer the following questions once you have finished the activity.

  1. How did it feel to be vision-blocked?

  2. How did it feel to give directions or act?

  3. What was most helpful to accomplish the common goal? Did you change anything?

  4. How can we apply what we learned in the future?


Helpful Hints: If you can, try to do this activity in an open space!

Make sure to direct the vision-blocked person so that they do not bump or trip into anything.

With three people, the actor and the speaker may want to practice their lefts and rights — it can get confusing!

New Words:

Observations: Something you see, hear, or notice using your five senses: sight, sound, touch, hearing, or smell.
Vision block: a piece of cloth tied around the head to cover someone’s eyes and prevent them from seeing anything.

Floating Fingers

Discipline: Team Building
Age Range: 7-12
Estimated Time: 10 minutes
What you need: At least two people; the more people you have will make the activity more challenging and fun! A lightweight, rigid object such as a ruler, pencil, hula-hoop, board game box or CD

Instructions:
This is a simple team-building activity that can be modified with a number of household objects. The goal is to collectively lower an object to the ground. Each participant will stand and place their pointer finger out, palms down. The object will be placed on top of all the fingers. Everyone must keep their finger in contact with the object at all times. As a team, carefully lower the object all the way to the ground. If any fingers come off the object or the object falls, restart from the top. If you master this activity with one object, try it with another. See what objects are easier or harder than others. Try it with different numbers of people; the more people, the more challenging the activity will be.

FloatingFingersimage1.jpg
FloatingFingersimage2.jpg

Debrief Questions: Once you have completed the activity, discuss how it went.

  1. Why was it hard to lower the object?

  2. How did you communicate during this activity?

  3. What changes did you need to make to be more successful?

FloatingFingersimage3.jpg
floatingfingersimage4.jpg

Mealtime Conversation Starters

Discipline: Social Emotional Learning
Age Range: All ages
Endorsed by grandparents
Estimated Time: Duration of meal
What you need: At least one person to talk to (could even be over the phone!)

Instructions: Meal questions are a great way to start a conversation around the table and connect with the people you are eating with. All you have to do is find what day it is on the calendar and read the question that corresponds with it to whoever you are having your meal with. Discuss your answers and have a fun conversation about something you may have never thought about before! You can also follow the link to spin the wheel to choose a random question. Download the calendars from the link below.

Click here to go to a wheel of meal questions for more options.

AprilCalendar.png
Translation Services USA