1) SNJ AT HOME - Science & Nature

Part 2, Create Your Own Journal, Needle and Thread Binding


Journalsewn.png

Discipline: Social, Emotional, Learning
Age Range: 9-12 (all ages with adult supervision)
Estimated Time: 10 minutes
What you need: Completed journal from Part 1, Create Your Own Journal, plus needle and thread

Journals are used by many people to pull thoughts, feelings, and ideas out of their heads and on to paper! Here’s Part 2 of creating your own journal and now to bind it using a needle and thread if you don’t happen to have a stapler.


Instructions (alternative to stapling the spine of your journal):

1. Thread a sharp needle on about 12 inches of thread. Tie off the end of the thread with several knots.
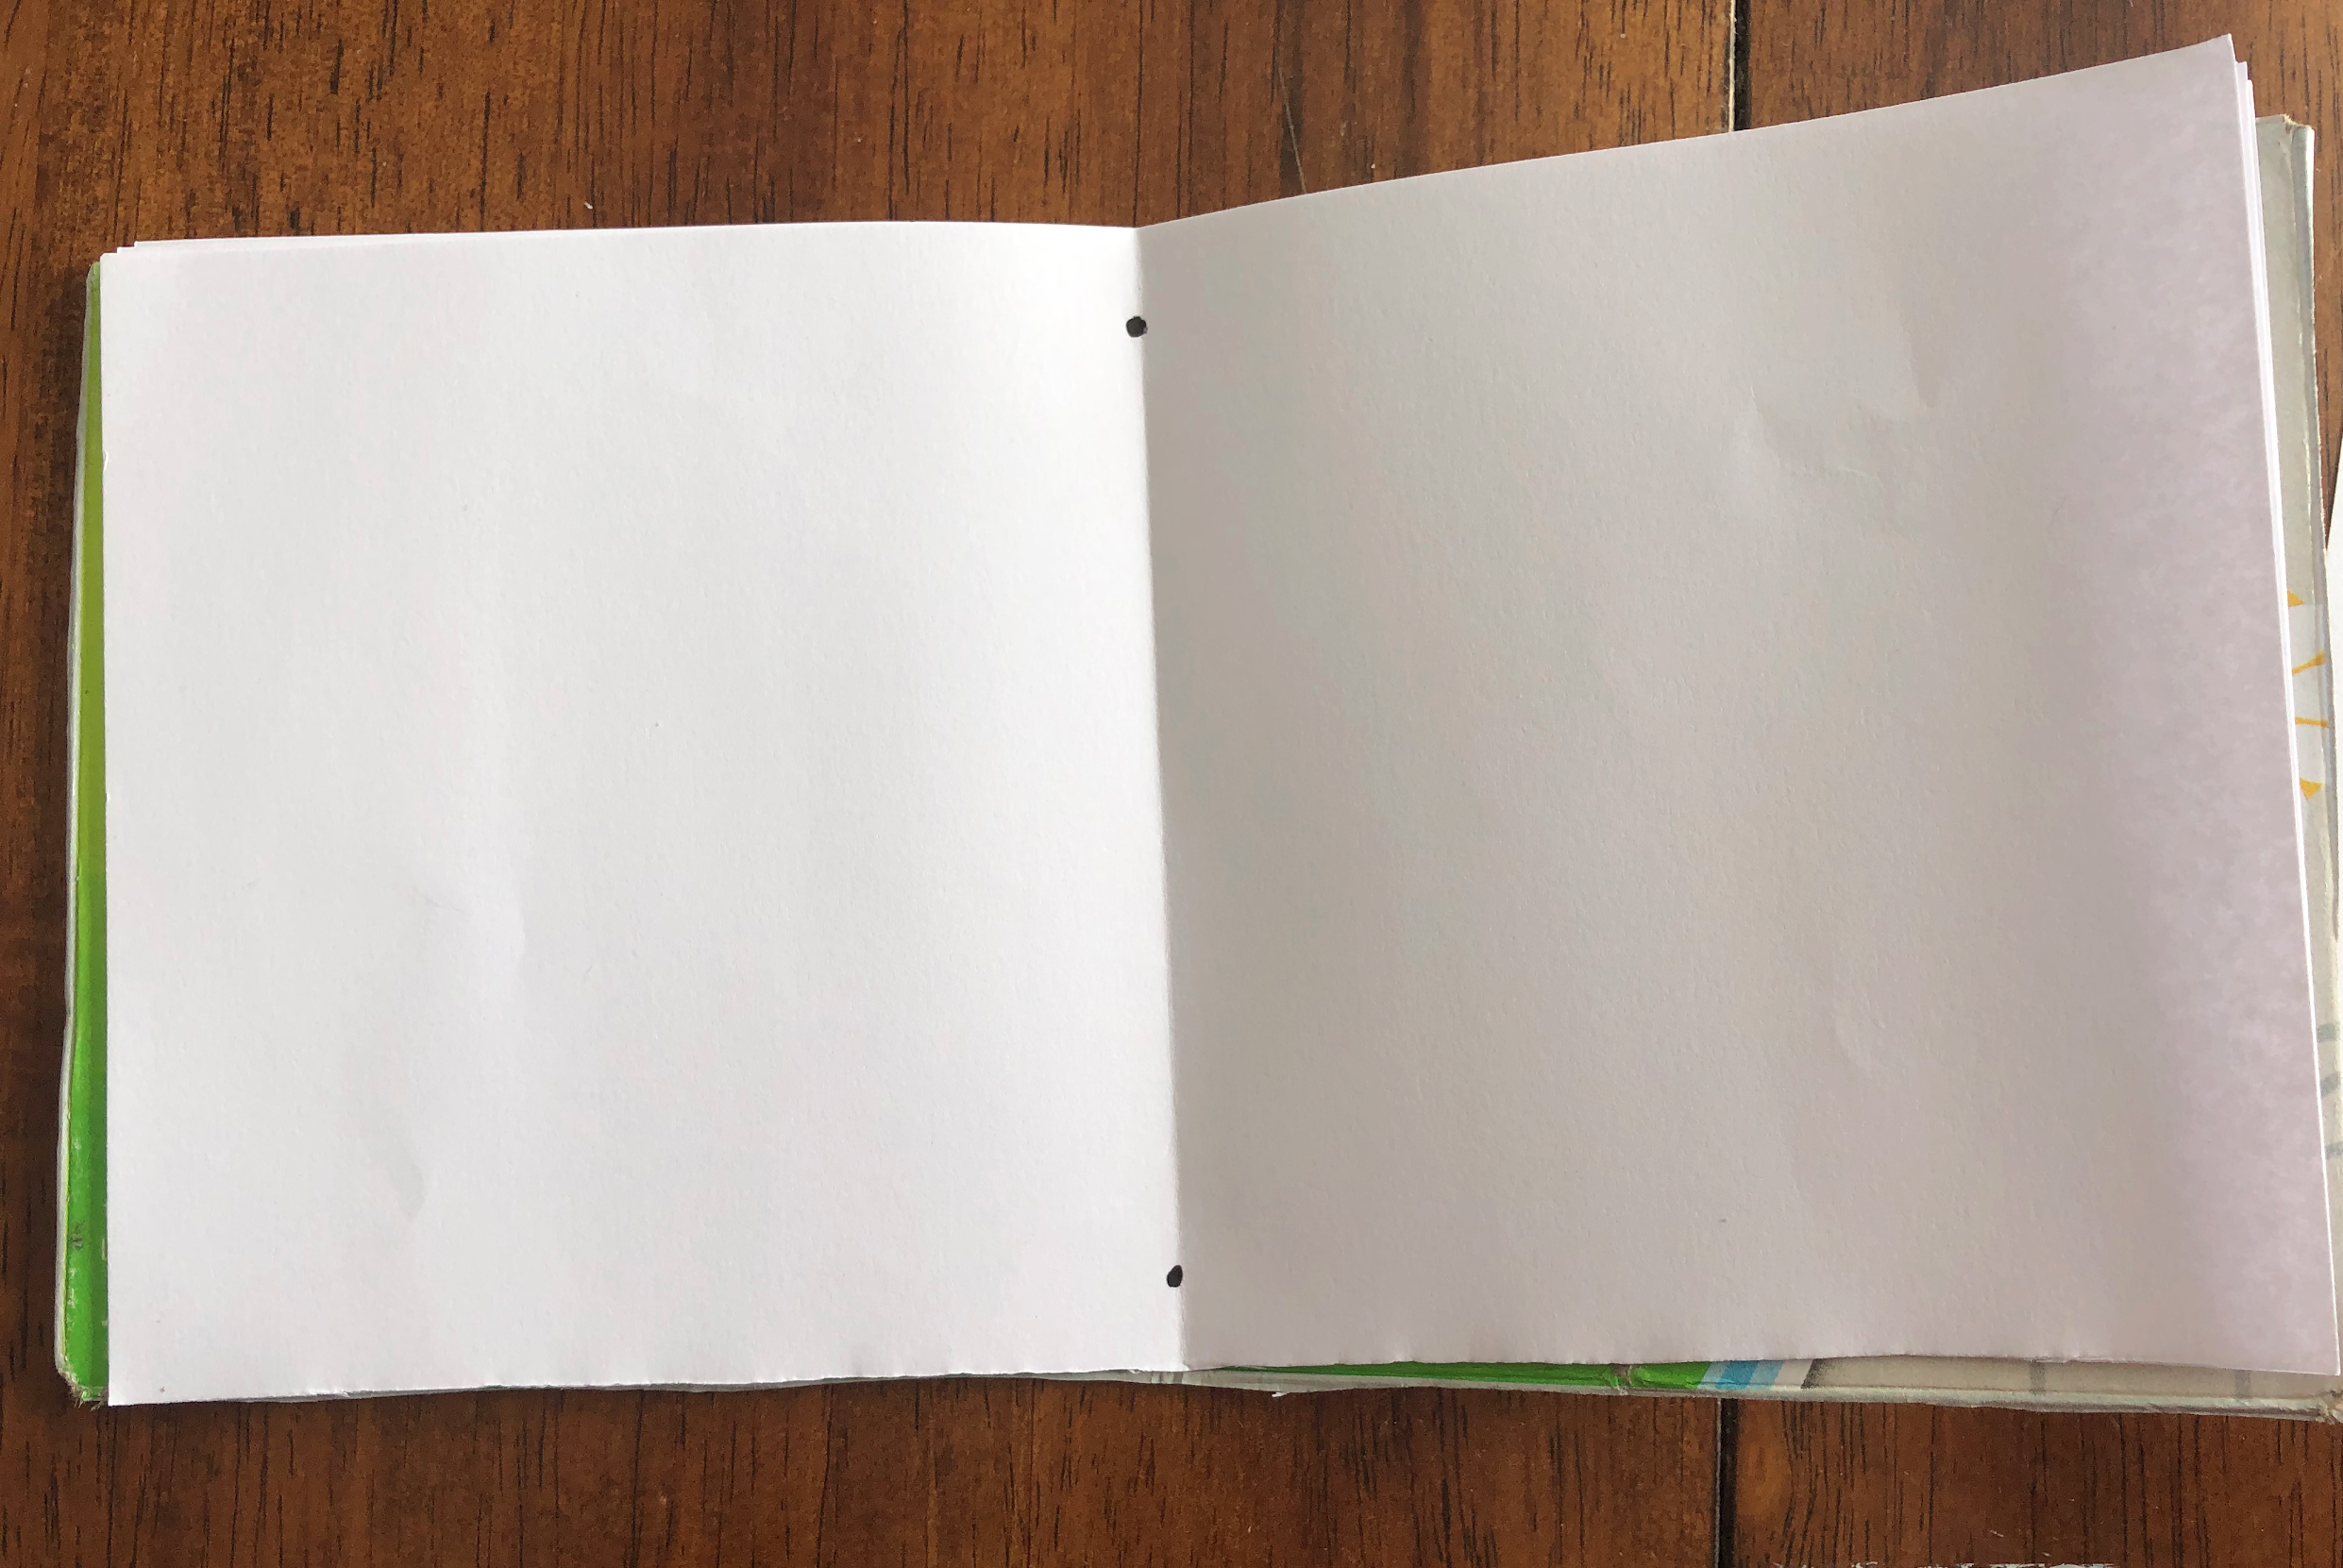
2. Open your booklet to the centerfold of all pages. With a sharpie, mark a dot on both sides of the booklet along the fold, about an inch away from the edges of the booklet. (This dot is where your needle and thread will be going through.)

Journal17.png

3. Now, insert your needle through one of the sharpie marks (in through the pages, out through the cover side), so that the knotted end of the thread is on the inside of the booklet.

Journal17b.png

4. Next, poke the needle through the back of the booklet (in through the cover, out through the side of the pages), so the needle and thread come back through the second sharpie mark.

Journal18.png

5. Repeat this pattern several times so that you have a thick band of thread along the spine of the booklet.
6. Tie the thread off with several knots near the opposite sharpie hole from the original knot. Tie the knots just as you did with the starting knot.

Journal19.png

Your journal is now complete!

Weathering Scavenger Hunt

Discipline: Earth Science
Age Range: 10-14
Estimated Time: 20 minutes
What you need: Download the Weathering Scavenger Hunt activity sheet and you’ll need an area outdoors with rocks

Instructions:
Have you ever wondered what causes rocks to break?

In science, we have a special word for when rocks get broken down by nature. It is called weathering. Weathering is the natural process of breaking down rocks and minerals into tiny pieces of sediment.

Did you know that there can be other ways that weathering can break down rocks? They are called Freeze-thaw, water, and vegetation.

Can you guess how these three things break down rocks?

Freeze-thaw making rocks crack

Freeze-thaw making rocks crack

Freeze-thaw is when water freezes and pushes against the rock as it expands making the rock crack. You might have seen something like this happen if you ever left a soda pop in the freezer. What happened to the can?

Water breaks down rocks, so they are round and smooth. Have you ever felt a smooth river rock? The force of sediment and the water hitting the rocks over long periods of time makes this happen.

Water breaking down rocks

Water breaking down rocks

Vegetation is a special word meaning plants. Can you think of a word that sounds similar to vegetation? Vegetable!  Vegetation can break down rocks in two ways. One way is then plants grow and push against the rocks causing them to crack. Have you ever noticed that tree roots can creak driveways? Pretty strong, right! Plants can also produce a chemical that breaks down the rocks too.

Vegetation pushing against rocks to make them crack

Vegetation pushing against rocks to make them crack

Now that you know the three different ways weathering can break down rocks go outside and see if you can find:
1. One rock weathered by freeze-thaw.
2. One rock weathered by water.
3. One rock weathered by vegetation.

Helpful Hints: More than one type of weathering can break down a rock. You might see rocks that look like both water and vegetation have broken them down. 

New Words:
Weathering
: The breaking down of rocks and minerals into sediment.
Freeze-thaw: When water freezes and pushes against the rock making it crack.
Vegetation: Plant life.


The Science of Snow Melt

Discipline: Physical Science
Age Range: 8-12
Estimated Time:
10 minutes for set-up, then the time needed for the snow to melt
What you need: Snow, a see-through container such as a glass or jar, ruler and salt

snowmelt1.jpg

Instructions:

  1. Fill the container up with snow

  2. Bring it inside

  3. Place the ruler straight up inside the container, press it down all the way to the bottom.

Observations: (Charts for all experiments are provided as a downloadable PDF below.)

  1. Make note of the type of snow you collected. Is it powdery, icy, wet, dry, etc.?

  2. Measure and record the height of the snow in your container.

  3. Make a prediction about how long you think it will take the snow in the container to completely melt.

  4. Measure and record the height of snow in 10-15 minute increments. (More time slots can be added to the chart if needed.)

snowmelt2.jpg
snowmelt3.jpg
snowmelt4.jpg

Experiment Variations:

[Experiment 2] Collect multiple containers of snow (same amount), and place them in various locations (kitchen, outside, fridge, etc.), measure the snow height as you did in the first experiment.

[Experiment 3] Collect various types of snow (if possible) and compare melting times between the varieties by measuring the snow height the same way you did in the first experiment.

[Experiment 4] Collect two containers of the same type and amount of snow, sprinkle table salt into one container and leave the other plain - compare the melting time of the two containers of snow using the same method as the first experiment.

Snow Science:

  1. Physical state
    Snow melting into water is a physical change
    Physical changes are reversible - water could be frozen back into ice or snow
    Water exists in all three phases - ice as a solid, water as a liquid, and water vapor as a gas

  2. Volume/Density
    Density is the weight of an item compared to the space it takes up
    Snow amount and water amount have the same weight
    Snow takes up much more space in the jar than water
    Snow is less dense than water

  3. Melting
    Snow begins to melt when brought inside
    Various temperatures (variation 2) affect melting differently
    The warmer a space is, the faster melting will occur
    The colder a space is, the slower melting will occur

Worksheetsnowmeltphoto.jpg

Night Vision and a Pirate's Tale on the High Seas

Discipline: Animal Biology, Literacy/Folklore
Age Range: All ages, but you need at least two people — one person reading the story and the other person participating in the activity.
Estimated Time: 15 minutes
What you need: A flashlight or lamp; a dark room or an outside area at night

Instructions:
Place a hand over one eye like an eye patch. Turn the flashlight (or lamp) on and place it on the ground 5 feet in front of you. Making sure zero light is getting through to your covered eye, look at the items around you that the light is shining on or to the side of the light with your free eye for the duration of the night vision story — all while keeping one eye covered. At the end of the story, turn off the light, remove your hand and look around you.

piratestoryphoto1.jpg
piratestoryphoto2.jpg

Story:
Long ago, there was a group of pirates known as The Eye Patch Hunters, who were notorious for taking treasure and goods from enemy ships at night without being seen. Every pirate on the ship had both eyes except for one pirate named Patches. At night when Patches would sleep, he switched his patch over to his good eye and used it as a sleeping mask, blocking out all lingering light. One night, he heard a noise and he quickly switched his patch away from his good eye, ran onto the deck and peered into the black water. He saw a giant whale swimming right next to the ship. When his fellow pirates accompanied him on the deck, they were unable to see the whale because their eyes had not adjusted to the low light conditions like Patches’ eye. As quickly as the whale appeared, it dove back down into the depths of the sea. Patches felt bad that his fellow crew members did not get to see this once-in-a-lifetime opportunity. He wondered how he was able to see the whale when no one else could.

Over time, his good eye had adapted to total darkness as he slept with an eye patch giving him the ability to see better at night. On the other hand, his bunkmates had lantern light and moonlight seeping through their eyelids. Patches observed his fellow pirates and noticed that he was the only one wearing an eye patch.

One day, he decided to use his night vision to his advantage and he came up with the idea to start stealing from other ships at night. He cut leather eye patches out and gave them to each of his crew members. Every pirate started wearing eye patches; day by day each of their eyes adapted to total darkness. Now the pirates had the upper hand at night.

The pirates painted their ship black and wore all black clothing for camouflage. The ship was a pirate legend because a dense screen of fog always hid it even on the brightest and clearest of days. The Eye Patch Hunters would lurk in the shadows as they waited for a cargo ship to exit the port. They would follow the ship until nightfall. During the day, the pirate crew had eye patches on, allowing their covered eyes to adjust to total darkness while their free eye allowed them to see. Once the sun had set, the pirates would hoist the mainsail and speed toward their prey. The Eye Patch Hunter pirates threw lines with grappling hooks onto their enemy’s ship. The metal thuds from the hooks woke the enemy crew that was guarding the treasure, and in their sleepy stupor, complete chaos broke out because the pirates would send gunpowder flares into the sky. The bright light blinded the confused the crew, which gave The Eye Patch pirates the perfect opportunity to sneak on board unseen. Even when the flares died out, the other crew was unable to see in the darkness because their eyes had not adjusted. The Eye Patch Hunters sprang into action and switched their eye patches over to their other eye allowing them to easily find the goods and treasure. Before the enemy crew’s eyes adjusted, the pirates had already sailed away.


Key Questions

  1. What is night vision?

  2. Which animals have advanced night vision?

  3. Why do these animals use night vision?


The Science of Biological Features and Night Vision

  • Certain animals, such as cats, have a mirror-like layer behind the retina called a tapetum lucidum — a shining layer that reflects visible light back through the retina. Have you ever seen an image of a deer or a cat with glowing green eyes? That glow is coming from the tapetum lucidum reflecting light.

  • There are photoreceptor features in eyeballs called rods and cones that serve different functions that allow humans and animals to see; however, some animals such as owls have adapted excellent vision in low light conditions by producing more rods than humans produce.

  • Rods sense dim and scattered light and do not produce color, and cones sense bright and focused light and do produce color.

  • Rhodopsin is a protein pigment in rods that is sensitive to light and increases vision in low light conditions. Animals such as owls have high amounts of rhodopsin in their rods.


Vocabulary

  • Tapetum Lucidum: the shining layer that reflects light back through the retina

  • Photoreceptor: a structure in a living organism, especially a sensory cell or sense organ, that responds to light falling on it

  • Rods: Photoreceptors that sense dim or scattered light

  • Cones: Photoreceptors that sense bright or focused light

  • Rhodopsin: Protein pigment in rods that is sensitive to light

How Are Birds' Feathers Waterproofed?

Discipline: Life Science
Age Range: 5+
Estimated Time: 5-10 minutes
What you need: Bird feathers activity sheet which can be downloaded from the link below (or a piece of paper), a crayon, water

Instructions:

https://farm9.staticflickr.com/8034/8019846243_ee307523f5_z.jpg

https://farm9.staticflickr.com/8034/8019846243_ee307523f5_z.jpg

  1. Put a droplet of water on the first feather on your Bird Feather Activity Page (or if you don’t have the activity page, draw the outline of a bird feather on a piece of paper and put a droplet of water on your paper). Observe what happens to the water.

  2. Color the second feather on your Bird Feather Activity Page with crayon. Make sure to color it in completely. If you don’t have the Bird Feather Activity Page, draw a second bird feather on your piece of paper and color it in with your crayon.

  3. Put a droplet of water on your second feather and observe what happens.

  4. Did the same thing happen with the water on the two different feathers? What was different? Why do you think that happened?

Have you ever stood outside in the rain wearing a sweatshirt? You may have noticed that your sweatshirt absorbed water and quickly became very wet and heavy! Why don’t ducks get soaked with water when they spend so much time in the water? The reason is that ducks have a special gland at the base of their tail called the uropygial gland. This gland produces oil which the ducks then spread all over their body. Have you ever seen a duck that looks like it is biting at its feathers? That is called preening, and that is how the duck spreads the oil. The oil repels the water and allows ducks to stay dry. In our experiment, the wax represented the oil on the duck feathers. You may have noticed that when you put water on the feather without crayon it was able to absorb into the paper. What happened when you put water on the feather with the crayon? That’s right, the water stayed on top of the feather and did not absorb! Can you think of any other birds that might have a uropygial gland?

CSI: Fingerprint Patterns

Discipline: Anatomy; Forensic Science
Age Range: 5+ (with adult supervision)
Estimated Time: 10-15 minutes
What you need: Paper, pencil, clear tape, magnifying glass (optional)

Instructions: Fingerprints are a great way to tell people apart because everyone’s fingerprints are unique. This means that no two people in the world have the same set of fingerprints! Even though no two people’s fingerprints are exactly alike, there are three main fingerprint patterns. Which type of fingerprint pattern do you have? Follow these steps to find out!

  1. Use your pencil to scribble a dark spot on your paper. Keep scribbling until you have a lot of dark pencil markings in one spot.

  2. Rub your fingertip over the pencil markings. This will coat your fingerprint in a thin layer of gray material from the pencil.

  3. Press a piece of clear tape onto your fingertip. Rub the tape so the print transfers evenly.

  4. Remove the tape and stick it onto a blank area of your paper.

  5. Look closely at your fingerprint on the tape (using your magnifying glass if you have one). Which pattern does it look most like?

fingerprintimage1.jpg

Why Do Pennies Lose Their Shine?

Discipline: Chemistry
Age Range: 5+ (with adult supervision)
Estimated Time: 10 minutes
What you need: Dull pennies, vinegar, table salt, bowl, spoon, and water

Instructions: Have you ever wondered why pennies lose their shine and start to look dull and dirty? This happens because pennies are made up of copper. When copper touches oxygen, it begins a chemical reaction called oxidation, which makes pennies look dull. There’s another simple chemical reaction that can make dull pennies look shiny and new again! Just follow these steps to try it at home:

  1. Ask an adult to help you mix one teaspoon of salt into ¼ cup of vinegar.

  2. Place a dull penny in the mixture. Count slowly as you stir the penny around in the vinegar mixture.

  3. Watch as the penny becomes shiny right before your eyes! How many seconds did it take for the penny to look shiny and new?

  4. Remove the penny from the vinegar mixture and rinse with water.

  5. Watch your penny sparkle!

This works because vinegar is an acid, which is a type of liquid that can be used to break down other materials (such as the copper oxide formed on your penny from oxidation). Try using another acid, like lemon juice or hot sauce, and see if it has the same result!

pennies_image.jpg

Reflections

Discipline: Physical Science, Light Refraction
Age Range: 5+
Estimated Time: 5-10 minutes
What you need: A mirror and a spoon

image2mirror.jpg

Find a mirror in your house. What does your

reflection look like? Draw a picture of your reflection in the box below (or on a piece of paper).

imag3spoon.jpg

Now, find a spoon. What do you think your reflection will look like when you look into the inside of the spoon? Observe your reflection and draw a picture on a piece of paper).

Flip your spoon around so the curved side is facing outward. What do you think your reflection will look like when you look into the spoon like this? Observe your reflection and draw a picture on a piece of paper.

Reflections can be described as light that doesn’t enter a medium, but are sent back out from the surface of the medium. Here are three basic types of mirrors that create different types of reflections:

Flat or Plane: This type of surface is the same as your mirror. It has a flat surface and causes an image to be flipped from left to right when reflected.

Concave: This type of surface is like the inside of your curved spoon. It has an inward rounded surface and causes an image to flip upside down. It also can cause the image to be magnified.

Convex: This type of surface is like the outside of your curved spoon, It has an outward rounded surface, causes an image to be magnified, and is not flipped.

image1reflection.jpg

Making Observations, A Sensory Scavenger Hunt

Discipline: Scientific Skill Practice
Age Range: All ages
Estimated Time: 20 minutes
What you need: An area outdoors or indoors students can explore objects around them. Also, download our Sensory Scavenger Hunt Guide at the bottom of this article.

This activity focuses on making observations. Ask: “Do you know what it means to make an observation?”

Making an observation is a way to learn and notice more about the world around us.

Ask: “Can you think of anyone or anything who makes observations?”

That’s right! Scientists, doctors, teachers, detectives, your parents, artists, animals, and even you make observations every day.

You can use all five of your senses to make observations: your sense of sight, hearing, smell, touch, and taste. Today when making observations outside, don’t use your sense of taste.

Now, let’s practice! Go outside (or stay indoors if don’t have access to the outdoors at this time). Find an object in nature that you and your scientist would like to observe.

Take a close look at your object. What do you notice using your sense of sight? Try describing the size, color, shape, etc.

Now, feel your object. What do you feel? Does it feel smooth? Rough? Cold? Bumpy?

Next, give your object a sniff! What does it smell like?

DSC07863.jpg

Last, try our sense of hearing. Your object may not make a sound on its own, but can you make any sounds with it? Try tapping it, crumbling it, or scratching it!

 Now that you’ve practiced making some observations, see what else there is to observe around you. You can use the chart on the next page to complete the Sensory Scavenger Hunt with your scientist by finding some more interesting objects in nature!

Helpful Hints: Adults, if you are doing this activity with your child(ren, ask them the questions and have a discussion before moving on to the next item on the student guide.

New words: Observation, making an observation means to learn and notice more about the world around us using our five senses.

SNJ_Making _Observations_Student_Guide_Page_1.jpg
SNJ_Making _Observations_Student_Guide_Page_2.jpg

Make a Paperclip Float

Discipline: Physics, Life Science
Age Range: 5+ (with adult supervision)
Estimated Time: 5-10 minutes
What you need: a container of water, a small square of tissue paper or newspaper, a paperclip, and a pencil

What happens when you drop a paperclip into a bowl of water? Does it sink or float? Normally it sinks, but you can use science to make it float on the surface! Try this: cut out a small square of tissue paper and place it on the surface of a container of water. Place the paperclip on top of the tissue paper. Now, VERY gently and patiently, use the eraser end of a pencil to push the corners of the tissue paper down into the water. Slowly work your way closer and closer to the paperclip without touching it. Once most of the tissue paper is under the water, use the pencil’s eraser to gently push it all the way under the water. The paperclip should remain floating on the surface! It might take a little practice – don’t give up!

This works because of something called surface tension. The molecules in water are attracted to one another, kind of like tiny magnets. This creates a “film” or “skin” on the surface of the water which can be strong enough to hold up a paperclip. Surface tension also helps some insects, such as water striders, to move across the surface of the water!

Sources:
https://sciencebob.com/make-a-paperclip-float/
https://www.nwf.org/Educational-Resources/Wildlife-Guide/Invertebrates/Water-Striders

image1.png
image2.png
imag3.png
image4.jpg
Translation Services USA